How To Make Pot Holders – A Universal And Customizable Hostess Gift
Going handmade this weekend? These elementary pot holders are a great beginner's sewing project and brand a great gift to add a handmade impact to someone's kitchen. Give them as a hostess gift or in a souvenir baskets with other home or kitchen goodies!
 View in gallery
 Supplies you'll need to craft these beautiful pot holders:
- one-half yard of patterned fabric for the front
- half yard of solid fabric for the back
- insulated interfacing
- sewing scissors and rotary cutter
- thread
- direct edge for measuring and cut
- pins or clips
- ribbon
- sewing automobile
 View in gallery
 How To Make Pot Holders – Stride past Footstep Guide
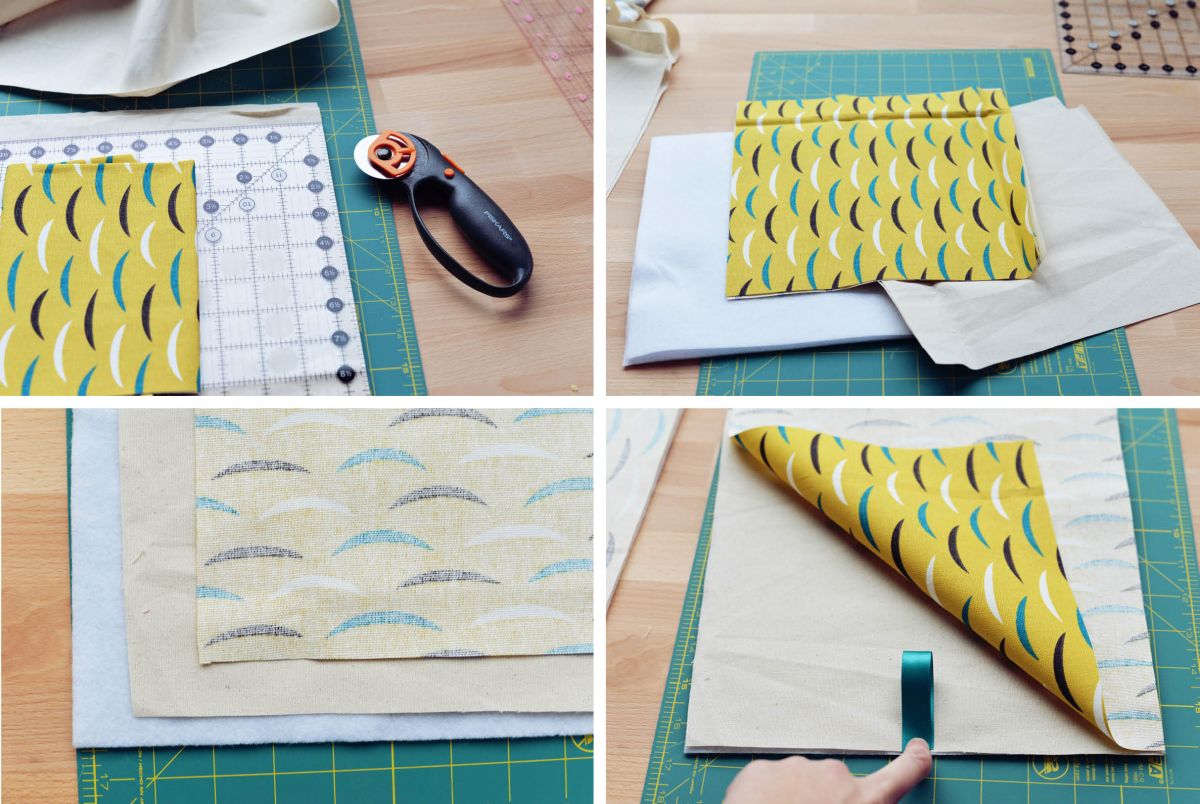
Step i: Cutting the fabrics
Start past cutting a 4 10.5 ten ten.5 inch squares from your fabric using your directly border and rotary cutter. Cut 2 of these from the patterned fabric and 2 from the solid fabric. Cutting out 2 more 10.v x 10.v inch squares from the interfacing. The 10.5 inch foursquare is the template that we used here which makes a 10″ square pot holder, if you adopt that yours are smaller you lot can arrange your sizes accordingly.
 View in gallery
 Step 2: Pinning and sweing
Layer your squares for pinning and sewing. Place the interfacing on the bottom, the solid fabric right side up, and the patterned fabric wrong side upward all lined up on top of each other.
Footstep 3: Put them together
Before pinning together your squares, cutting a slice of ribbon approximately 2 inches, fold in one-half and place in between your solid and patterned fabric on 1 of the sides. Pin in place.
 View in gallery
 Step 4: clips
Using clips or pins, spike together your foursquare in preparation for sewing.
Step 5: Sewing procedure
Using your sewing machine, sew around 3 sides of the squares with a i/iv inch to one-half inch seam including the side with the pinned ribbon.
Step 6: Trim corners
Later on you sew around the foursquare, trim the corners and flip inside out between the design and solid fabrics. Fold the bottom edges that were left open in to make a hem and attach with pins or clips.
Step 7: Sew the edges
Sew a i/4 inch seam around the pot holder. This will fasten together the lesser seam and give your pot holders a finished look.
 View in gallery
 You can optionally finish off your pot holders with stitching down the centre of the pot holder, quilt information technology, or get out as is!
 View in gallery
  View in gallery
 Repeat steps ii-7 for the second pot holder to finish off your set! Such a simple project you can make a bunch in an afternoon.
Source: https://www.homedit.com/diy-pot-holders/
0 Response to "How To Make Pot Holders – A Universal And Customizable Hostess Gift"
Enregistrer un commentaire